As a first step towards modelling the system displayed in the backdrop drawing, navigate to Manage Models > Quick Start from the main menu. This will open the Quick Start (Wadiso 6.1) window, which was displayed at start-up. Click on the Create New button. When the file browser appears, select the desired destination (Documents\GLS\Wadiso\), and type in a file name (e.g. “Wadiso 6 - Tutorial 2”), confirming the *.wlz (standard Wadiso model file format) for the file type. Once this is done, click on Save.
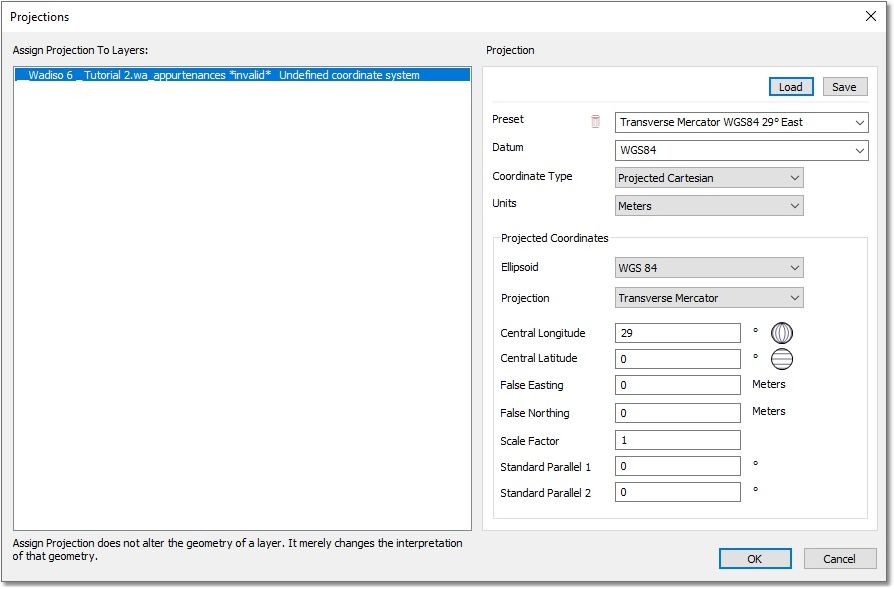
Before the model can be shown, a geodetic projection needs to be set. The following form will be shown:

You will notice that the Wadiso model has an “Undefined coordinate system”, which must first be resolved. Click on the Load button at the top right, then select the Documents\GLS\Wadiso\Albion\Projections\WGS84-29_Projected.prj file, and then select Open. This will load WGS_1984_Transverse_Mercator (29 degrees east) projection. Alternatively, enter/select all the values in the right-hand pane, until they match the screen-shot above. The input values displayed in the screen-shot above are merely one of many sets that can be chosen. It is advised that you study the Albion tutorial for a more detailed explanation about projection settings.
After you have selected or defined the projection for the model, click on the OK button.
A new, empty model will be created, and its various layers/tables will be displayed in the GIS Layer Manager. A set of tables relating to pipes, pumps, valves, sources, junctions and appurtenances has been created.