There are various ways to edit the system data. In particular, what is required for this example is to input the pipe diameters. The pipe diameters that will be edited are found in the Diameter (mm) field.
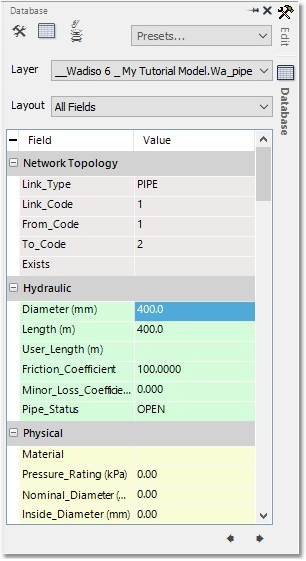
The first method to edit pipe data is to click on a pipe, and edit its pipe diameter in the database properties editor (also referred to as the Database box). This Database box can be opened when hovering over the ![]() Database icon (located on the rightmost vertical toolbar, as shown below). Here, we will find all the information about the currently selected item (i.e. the GIS database-entry). In order to pin this box to the interface, click on the
Database icon (located on the rightmost vertical toolbar, as shown below). Here, we will find all the information about the currently selected item (i.e. the GIS database-entry). In order to pin this box to the interface, click on the ![]() Pin to prevent auto hiding icon, situated in the top right-hand corner of the box (see below):
Pin to prevent auto hiding icon, situated in the top right-hand corner of the box (see below):
![]()
Use the above-described first method by clicking on Pipe 1 (the first pipe captured), and in the Database box, overwriting the default diameter of 100 with a value of 400 for the Diameter (mm) field value, as indicated below:

The second method also uses the Database box, but here we multi-select pipes to edit the common diameter. So, click on Pipe 3, and then Ctrl + click on Pipes 4/5/6. All four pipes are selected. The Database box is now common to all four pipes, and corresponding data appears in the fields. Where data is not common, two hyphens appear. For this case, all four pipes were captured with a default 100 mm diameter. This value can be overridden in the Database box by typing 400 for the Diameter (mm) field value. All four pipes will be updated with this diameter.
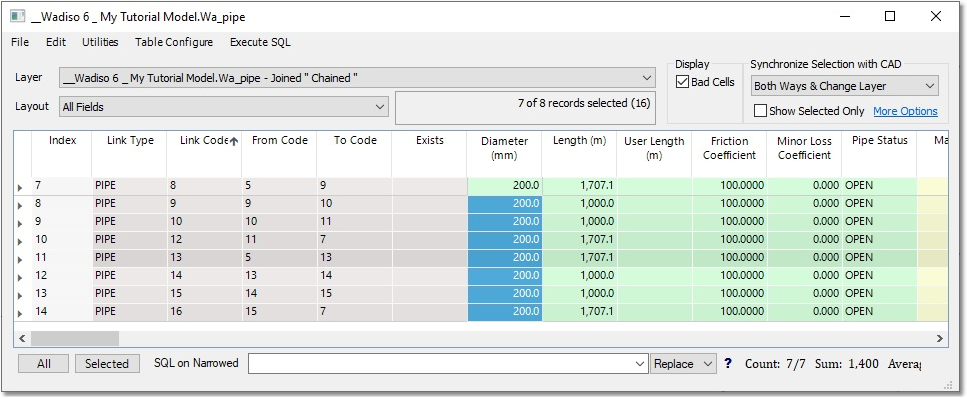
The third method is to enter the diameters in the grid editor. Again use Ctrl + click to pre-select Pipes 8/9/10/12/13/14/15/16. Then, navigate to Model Data > Model Tables > Pipe/CV to open the Pipe table. The selected pipes will be highlighted. Use the Selected button in the bottom left-hand corner of the table to view only the selected sub-set of pipes. Type 200 in the Diameter (mm) field of Pipe 8, and then use Edit > Copy to select the value. Then, select the remaining values, and use Edit > Paste to populate it for the other seven pipes, as shown below. Alternatively, select the entire Diameter (mm) field (after clicking on the Selected button), and type 200, followed by pressing Enter/Return on the keyboard.

Use a method of own choice to enter 500 mm for Pipe 7, and 300 mm for Pipe 17 and Pipe 18.